
Wildlife photography is a captivating art form that allows us to appreciate and document the beauty of nature. It plays a crucial role in conservation efforts by showcasing the remarkable diversity of wildlife species and their habitats. Through powerful images, wildlife photographers inspire others to develop a deeper connection with nature and raise awareness about the importance of protecting our natural world.
For beginners, wildlife photography can be an exhilarating and rewarding pursuit. The opportunity to capture awe-inspiring moments of animals in their natural habitats is both thrilling and fulfilling. However, it’s essential to acknowledge the challenges that come with this genre of photography. Patience, persistence, and a thorough understanding of animal behavior are crucial for achieving remarkable wildlife shots. As beginners embark on their journey, they can expect to encounter various hurdles, but with dedication and practice, they can develop their skills and create stunning photographs.
Essential Equipment for Wildlife Photography
1. Camera Body
When it comes to wildlife photography, choosing the right camera body is vital. Look for a camera that offers high resolution and low-light performance, as it will allow you to capture detailed images even in challenging lighting conditions. Additionally, consider a camera with fast autofocus capabilities to track and capture fast-moving subjects.
2. Lenses
The choice of lenses is crucial in wildlife photography, as it determines your ability to capture subjects at a distance. A telephoto lens with a long focal length, such as 300mm or 400mm, is ideal for wildlife photography. It enables you to get close-up shots of animals without disturbing them and helps isolate the subject from the background, creating stunning images. Additionally, investing in a teleconverter can extend the reach of your lens, allowing you to capture even more distant subjects.
3. Tripod or monopod
Stability is key in wildlife photography, especially when using long telephoto lenses. A sturdy tripod or monopod provides support, reduces camera shake, and allows you to maintain sharpness in your images, particularly when shooting with slower shutter speeds or heavy lenses. Consider lightweight and durable options that are easy to carry during outdoor excursions.
4. Additional accessories
- Lens hood: A lens hood helps reduce lens flare and protects your lens from stray light and potential damage.
- Filters: Consider investing in filters like polarizers and neutral density filters. A polarizer helps reduce glare and enhance colors, while a neutral density filter allows for longer exposures, enabling creative effects such as blurring water or capturing movement.
- Extra batteries and memory cards: Wildlife photography often involves long hours in the field, so carrying spare batteries and memory cards is essential to avoid missing precious moments.
- Camera bag: Invest in a comfortable and durable camera bag that can accommodate all your equipment and provide protection from dust, moisture, and accidental bumps during outdoor adventures.
It’s important to note that while having top-of-the-line equipment can enhance your photography, it’s not the sole determinant of success. Skill, patience, and creativity play equally important roles in capturing remarkable wildlife shots.
19 Pro Wildlife Photography Tips & Techniques for Beginners
As a professional photographer, capturing captivating images of wild animals in their natural habitats is my passion. To excel in this field, it is essential to understand the intricacies of wildlife photography and be equipped with the right techniques and knowledge. Allow me to share some valuable tips and expand upon the existing paragraphs to provide you with a comprehensive guide.
Immerse Yourself in Animal Knowledge
The challenge of wildlife photography lies in the inability to control wild creatures. The success of your shots greatly depends on understanding their behavior and being able to interpret it effectively. To ensure you don’t miss out on capturing captivating pictures, it is crucial to study the animals you plan to photograph. I recommend thoroughly researching and observing other wildlife photographers and nature enthusiasts. Pay close attention to their movements and interactions with animals, and try to emulate their techniques during your own shoots. Practical experience combined with observing seasoned professionals will accelerate your learning process more effectively than any book or guide.
Sharpen Your Skills Through Practice
When it comes to wildlife photography, many animals, especially those in the wild, tend to be cautious and easily startled by human presence. Therefore, I advise starting your photographic journey by capturing images of pets or domestic animals in your vicinity. This approach allows you to observe and understand animal behavior while gaining valuable experience before venturing into photographing more elusive and challenging subjects.
Visiting a nearby zoo can also serve as an excellent training ground to hone your wildlife photography skills. Zoos provide a safer environment where many animals are contained in cages or are situated at a significant distance from visitors. Additionally, zoos often have knowledgeable staff who can share valuable insights and details about various animals, enriching your understanding and appreciation for wildlife.
Seek Out Ideal Wildlife Locations
Choosing the right locations for your wildlife photography endeavors is crucial. One of the best places to start capturing animal images is within wildlife parks. These parks typically provide detailed lists of the animals residing within their territory and offer maps highlighting specific areas where you can encounter various species.

Here are ten noteworthy locations known for their exceptional wildlife photography opportunities:
- Masai Mara National Reserve, Kenya
- Volcanoes National Park, Hawaii
- Pantanal, Brazil
- Denali National Park Preserve, Alaska
- Central Kalahari Game Reserve, Botswana
- Nantucket National Wildlife Refuge, United States
- Galapagos Islands, Ecuador
- The Amazon Basin, Brazil
- Jim Corbett National Park, India
- Skomer Island, Pembrokeshire, Wales
When photographing wildlife, patience is crucial as it may take time for animals to appear. Therefore, it is essential to find a safe and comfortable spot where you can comfortably lie down for extended periods. Since some animals may only emerge during specific periods, it is advisable to arrive at your chosen location before sunrise and remain until sunset. To plan your route effectively, leverage the convenience of tools like Google Maps.
Select the Right Camera Gear
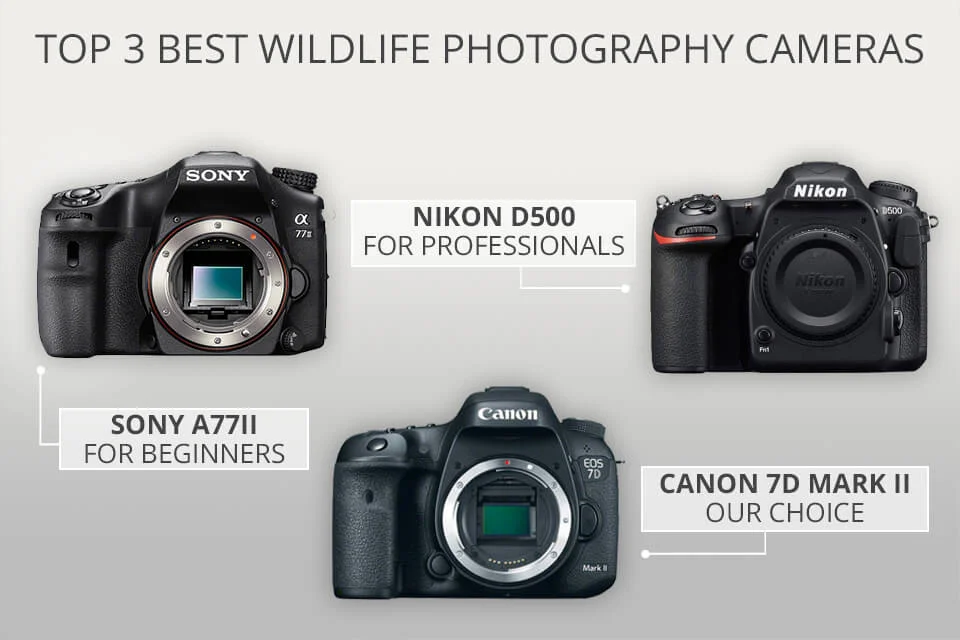
Not every camera available on the market is suitable for wildlife photography. For optimal results, I recommend investing in mirrorless or SLR cameras. Mid- to pro-level options are often weather-resistant, allowing for manual adjustments and compatibility with a range of lenses.
For instance, while the SONY A77II is a conventional camera, it may not withstand exposure to harsh elements for extended periods. Therefore, it’s important to prioritize a weather-resistant model that can endure challenging conditions. Additionally, consider investing in additional protective measures to ensure your camera remains stable and operational under any circumstances.
Not all modern cameras, such as the NIKON D500, are adept at outdoor wildlife photography. Hence, it is crucial to opt for models that offer a manual mode. This feature allows you to have full control over the camera’s settings when automatic features may not yield optimal results.
The ability to use interchangeable lenses provides flexibility in capturing close-up shots of insects or photographing large animals from a distance.
Utilize the Ideal Telephoto Lens
A telephoto lens is an essential tool for wildlife photography, allowing you to shoot from a significant distance. While some telephoto lenses offer optical stabilization (OS) to minimize shake at extreme magnifications, they can be quite expensive.
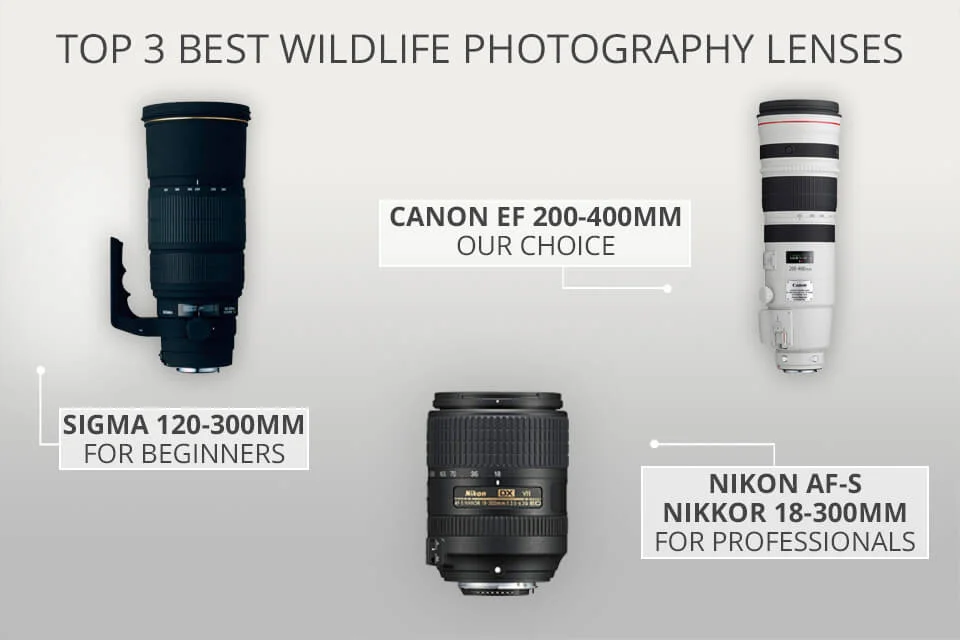
For novice photographers on a tight budget, a plastic telephoto lens can be a suitable option. Although plastic lenses lack OS, you can ensure stability by using a tripod and setting a high shutter speed to minimize blurring.
Consider investing in a telephoto zoom lens for added versatility during your shooting process. An 18mm-300mm lens, such as the NIKON AF-S NIKKOR 18-300MM, provides a cost-effective solution for photographing subjects at both long and close distances. With further exploration, you may even find models with optical stabilization.
For those seeking a telephoto lens with a fixed focal length and without extensive zooming capabilities, a 100mm lens like the SIGMA 120-300MM offers an optimal choice. It is worth noting that some of the best beginner wildlife photography lenses are those from old film cameras due to their high-quality glass, reliability, and affordability.
To capture insects and other small creatures effectively, a macro lens for close-up shots is essential. Consider a 100mm lens with a maximum aperture of at least f/2.8, as they excel in macro photography tasks.
Alternatively, you can experiment by adapting your regular lenses. Extension tubes or adapters allow you to attach lenses to the camera backward (reverse mounting). If this option doesn’t suit you, try using a telephoto zoom lens and zoom in from a significant distance to achieve a pseudo-macro effect. While not ideal for true macro photography, it can still yield impressive results.
Prioritize the Protection of Yourself and Your Gear
When embarking on wildlife photography expeditions, it is crucial to prioritize your safety and the protection of your gear. Here are some essential measures to consider:
Wear a hat that provides protection from rain or intense sunlight. A boonie hat is an excellent choice as it covers not only your face but also your head. Additionally, consider acquiring a hat with a mosquito net to shield yourself from annoying flying insects.
Invest in a large raincoat that covers your entire body, including your bag and camera. This versatile garment can also serve as a small tent during heavy rain.
In colder weather, a warm jacket becomes essential to keep you comfortable. Additionally, consider purchasing photography gloves that allow for dexterity while keeping your hands warm.
Opt for a reliable and water-resistant camera backpack, such as the Lowepro DryZone 200. Choose a muted color option that won’t distract animals during your shoots. Look for a model with multiple compartments to accommodate cameras, lenses, memory cards, batteries, and additional space for essentials like medication and clothing.
Always carry a rain cover specifically designed for your camera and lens, such as the Altura Photo Professional Rain Cover. This protective accessory ensures your equipment remains shielded not only from rain but also from mud, dirt, and other unfavorable elements. Additionally, consider wrapping your camera body with a shower cap or using transparent food-grade wrap for added protection.
Employ a Sturdy Tripod
Investing in a reliable tripod is crucial for serious wildlife photographers. Avoid purchasing the cheapest options as tripods with plastic legs are prone to breakage and may not support a bulky camera with a long lens. Instead, opt for carbon fiber or aluminum models to ensure stability and safety for your gear.
While these tripods may be slightly more expensive, they provide peace of mind, knowing that your camera and lens are secure and won’t accidentally fall to the ground. I highly recommend the Manfrotto MT190XPRO4 tripod for its stability and durability.
When choosing a tripod, opt for one with multi-angle legs to accommodate uneven surfaces. After adjusting the legs, ensure that they are securely locked in place. To ensure your camera is level, utilize the spirit level, typically a green cylinder or circle located on the tripod head. If the bubble in the spirit level remains centered, it indicates a straight camera angle. An excellent option to consider is the ProMaster Professional XC525C tripod.
The tripod head is equally important. For wildlife photography, many professionals recommend using a gimbal head or a ball head. If you’re shooting with a medium telephoto lens that isn’t too bulky, a ball head provides smooth rolling and easy adjustments. However, for long and large telephoto lenses, a gimbal head is recommended to balance the weight of the lens when holding the camera.
Master ISO Settings
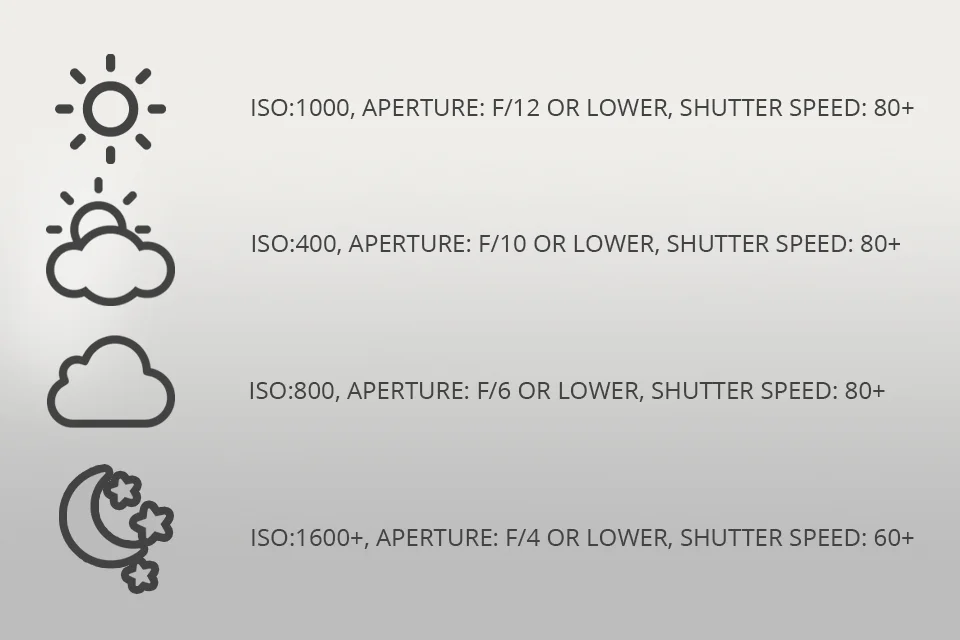
When it comes to camera settings in wildlife photography, carefully selecting the ISO value is crucial. To reduce noise in your frames, I suggest setting a low ISO, such as 100 or 200.
In low-light conditions, you may need to increase the ISO; however, ensure that it doesn’t compromise image quality. Depending on your camera’s capabilities, ISO 800 can be a suitable value for shooting in insufficient lighting without introducing excessive noise.
Consider the Importance of Shutter Speed
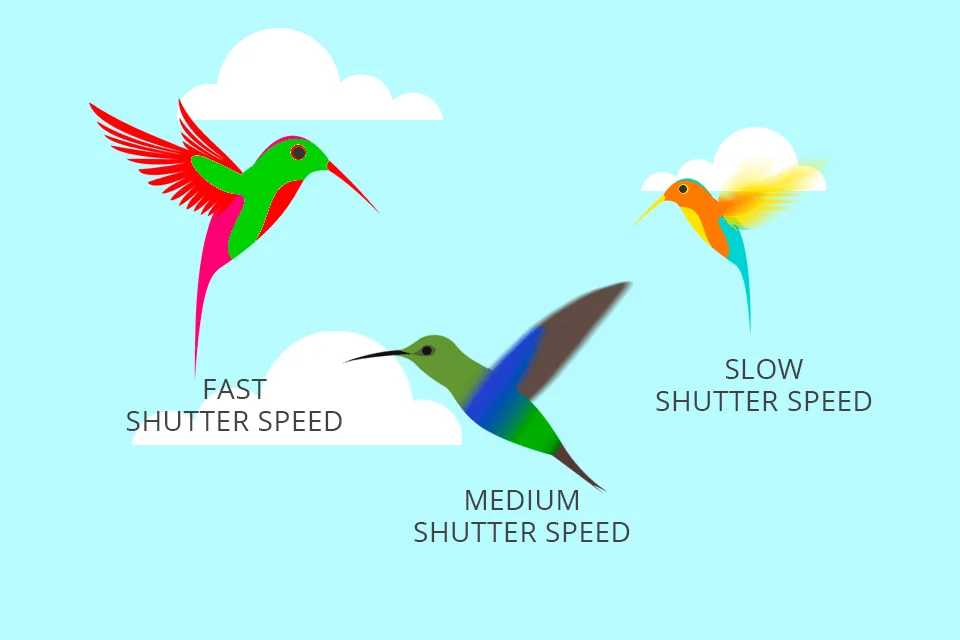
For capturing active animals that are constantly in motion, it is essential to set a fast shutter speed to prevent motion blur. A faster shutter speed allows you to freeze the action and ensure you don’t miss crucial moments.
For slower-moving animals, a shutter speed of 1/1000 sec. can be ideal. However, if you’re photographing birds or other fast-flying subjects, selecting a shutter speed of 1/2000 sec. or higher is recommended.
Master Focus Settings
To capture stunning wildlife images, understanding focus settings for different situations is crucial. For photographing moving animals, continuous autofocus is the ideal choice. It enables accurate tracking of subjects and helps avoid blurry images.
However, when photographing from a significant distance, autofocus may sometimes select the wrong focus point, such as leaves or other animals. In such cases, manual focus allows you to direct your lens precisely where you want it, avoiding unwanted distractions and ensuring optimal focus.
Maintain a Low Profile
When photographing animals, it’s essential to remember that any noise or sudden movement can startle them. Therefore, maintaining a calm and quiet demeanor is crucial during wildlife photography. Approach animals when they are not looking in your direction, making slow and careful movements. Once you’re in position, focus your camera and press the shutter release.
It’s worth noting that even the quietest shutter can produce noise that animals can easily hear. If your camera has a silent shutter function, I highly recommend using it, as it minimizes sound and reduces the chance of disturbing or frightening animals. While burst mode may seem appealing, it’s not always suitable for wildlife photography, as the continuous shutter noise may draw unwanted attention or scare off your subjects. However, for photographing fast-moving animals, burst mode can be utilized without causing a disturbance.
Apply Composition Techniques
Composition plays a vital role in wildlife photography, allowing you to create visually appealing and engaging images. One popular composition rule to employ is the rule of thirds. By dividing your frame using an imaginary grid, position your subject at one of the intersections. This technique helps achieve a well-balanced composition. Many cameras offer a grid overlay option on the display to assist with framing and adhering to the rule of thirds.
It’s crucial to leave sufficient room for your subject’s head within the frame to create visually appealing images. For example, if you’re photographing an animal looking to the right, adjust the framing by moving the subject within the frame, providing enough space for the animal’s movement. Avoid tightly cropping the subject, as it can make the photograph feel cramped and unnatural.
Additionally, consider capturing elements of the animal’s environment to provide context and enhance the overall storytelling of your images. Allowing viewers to glimpse the animal’s natural habitat adds depth and interest to your photographs.
Experiment with Dramatic Lighting
In wildlife photography, lighting can greatly impact the mood and impact of your images. I highly recommend experimenting with different lighting techniques to create unique and visually striking photographs. For example, rim lighting or backlighting can add a captivating and ethereal quality to your images. Side lighting can create interesting portrait shots, emphasizing texture and depth. Additionally, exploring silhouettes against sunset, sunrise, moonlight, or cloudy skies can add drama and evoke a sense of intrigue.
Embrace Minimalistic Approaches
The minimalistic approach can be incredibly powerful in wildlife photography. Utilizing simple backgrounds, such as water, snow, or green grass, can create visually stunning and impactful images. By focusing on a single subject and minimizing distractions, you direct the viewer’s attention to the main subject, allowing it to take center stage.
Explore Black and White or Monochromatic Imagery
Black and white or monochromatic images have a timeless and artistic appeal, often used to great effect in wildlife photography. When faced with busy backgrounds or distracting elements, converting an image to monochrome can eliminate distractions, allowing the viewer’s eyes to focus solely on the subject. Additionally, black and white images can evoke a sense of nostalgia and emphasize the textures, shapes, and forms of the animal subjects.
Experiment with High-Key Photography
High-key photography can yield stunning results in wildlife photography, particularly when combined with the right subjects. This technique involves avoiding strong highlights and instead harmoniously blending the subject with the background. Subjects such as polar bears, zebras, or white birds like egrets lend themselves well to high-key photography. By using light or almost white tones, you can create visually striking and ethereal images.
Observe and Capture Patterns
Patterns are abundant in nature, and capturing them can result in visually striking and mesmerizing wildlife images. Observing patterns requires practice and a keen eye. You can compose pattern shots by capturing multiple subjects arranged in a line, with one odd object placed strategically according to the rule of thirds. Additionally, animals with naturally occurring patterns, such as leopards or giraffes, can provide excellent opportunities for pattern photography. When photographing birds, zooming in close enough can reveal intricate patterns in their feathers.
Utilize Weather and Water Elements
To add a unique atmosphere and visual interest to your wildlife images, consider shooting in foggy, rainy, or snowy weather conditions. These elements can create a sense of drama and mood in your photographs. When photographing in rainy weather, I recommend using a longer lens with a protective hood to shield it from moisture. Additionally, a plastic shower cap can be a convenient and affordable tool for covering a wide-angle lens. Embrace the elements and leverage them to enhance the storytelling aspect of your wildlife photography.
Seek Inspiration from Prominent Wildlife Photographers
Inspiration can be found in the work of renowned wildlife photographers who have made significant contributions to the field. Here are a few photographers whose work you can explore for inspiration:
Park, Rene Van der Schyff has gained recognition for her stunning wildlife photos, which have been featured in renowned magazines and exhibited worldwide. As an experienced tour leader and podcaster, Rene is always eager to share her wildlife photography tips for beginners.
Nick Nichols
With a career spanning decades, Nick Nichols is a celebrated wildlife photographer who has explored remote areas across the globe. His breathtaking images have garnered numerous awards and have been featured in National Geographic magazine. Nichols’ extensive portfolio includes 26 captivating wildlife photography stories published by National Geographic, including the acclaimed “The Short Happy Life of a Serengeti Lion.”
Nick Brandt
Known for his unique approach to wildlife conservation photography, Nick Brandt pushes the boundaries of the genre to convey powerful messages through his imagery. He has captured the eternal conflict between humanity and nature in his thought-provoking photographs. Brandt’s work serves as an inspiration for aspiring conservation photographers who seek to make a positive impact through their images.
Cristina Mittermeier
With a background in marine sciences and fine art photography, Cristina Mittermeier is a prominent figure in conservation photography. As the founder of the International League of Conservation Photographers (ILCP) and Sea Legacy, she actively engages photographers as advocates for wildlife conservation. Mittermeier’s images highlight the beauty and vulnerability of the natural world, inspiring viewers to take action in preserving our planet.
Frans Lanting
Renowned globally for his expertise in wildlife photography, Frans Lanting has made significant contributions to the field. His photographs have been published in prestigious journals and books, and he has participated in numerous exhibitions. Lanting’s work captures both the awe-inspiring beauty of wildlife and the impact of human activities on the environment.
Joel Sartore
Joel Sartore is an exceptional photographer dedicated to raising awareness about endangered species through his Photo Ark project. Over the course of 25 years, he has documented thousands of species, creating a powerful archive that showcases the diversity of life on Earth. Sartore’s commitment to wildlife conservation serves as an inspiration to photographers and conservationists alike.
Charlie Hamilton James
As a photographer for National Geographic, Charlie Hamilton James has explored a wide range of subjects, from Amazonian tribes to urban rats. His work captures the intricate relationship between humans and wildlife, offering a unique perspective on the natural world. James’ iconic wildlife photography showcases the diversity of our planet and encourages viewers to appreciate and protect it.
By studying the works of these accomplished photographers, you can gain valuable insights into different approaches, techniques, and storytelling methods in wildlife photography.
Freebies for Editing Wildlife Photography
Additionally, to enhance your wildlife images during post-processing, you can take advantage of free tools and presets specifically designed for editing wildlife photography. These tools can help you fine-tune the white balance, enhance dynamic range, and achieve the desired effects. Some recommended freebies include:
Cool Light
An efficient tool for adjusting white balance and achieving accurate color representation in your wildlife photos with just a few clicks.
Rich HDR
A preset that adds a dramatic and stylized effect to your wildlife images, enhancing the overall visual impact.
Sunny Day
This preset is ideal for optimizing images captured on bright, sunny days, helping you manage challenging lighting conditions.
By utilizing these free editing tools, you can elevate the quality and impact of your wildlife photographs during post-processing.
I hope these expanded tips and additional information help you in your journey as a wildlife photographer. Remember to keep exploring, learning, and practicing, as wildlife photography is a continuous process of growth and discovery. Happy shooting!


