
Ever felt that pang of disappointment when you excitedly open your iPhone camera roll, only to be met with a blurry mess? We’ve all been there. Shaky hands, unexpected movement, or even a dirty lens can turn a picture-perfect moment into a forgettable one. But fear not, fellow iPhone photographers! You don’t have to be a professional to capture stunning, crisp images.
This blog post is your one-stop shop for transforming your iPhone photography game. We’ll unveil 7 powerful hacks that will banish blurry photos from your life and elevate your pictures to razor-sharp perfection. Whether you’re a seasoned shutterbug or just starting your mobile photography journey, these tips are guaranteed to make a difference.
So, ditch the frustration and get ready to say “cheese” with confidence! We’re about to unlock the secrets to iPhone clarity, equipping you with the knowledge to capture those special moments in all their vibrant detail. From mastering built-in features to discovering hidden settings, we’ll cover everything you need to know to consistently produce eye-catching, share-worthy photos.
Are you ready to transform your blurry photos into brag-worthy masterpieces? Let’s dive into these 7 iPhone hacks and take your mobile photography skills to the next level!
How to Fix a Blurry Picture on iPhone
Are you tired of capturing blurry photos on your iPhone? Don’t worry, there are several simple steps you can take to fix this issue. Whether you’re dealing with smudged camera lenses or shaky hands, we’ve got you covered. Let’s dive into the solutions to help you capture clear and crisp images on your iPhone.
1. Clean your camera lens
The first step in fixing a blurry picture on your iPhone is to ensure that the camera lens is clean. Over time, the lens can accumulate smudges, fingerprints, and dust, which can affect the quality of your photos. By cleaning the lens, you can improve the clarity and sharpness of your pictures.
To clean the camera lens, use a microfiber cloth or a lens cleaning solution specifically designed for lenses. Avoid using harsh materials like paper towels or your clothing, as these can scratch or leave residue on the lens. Gently wipe the lens in a circular motion to remove any dirt or smudges.
It’s also important to clean the lens regularly, especially if you often use your iPhone’s camera. Make it a habit to check the lens before taking photos, and give it a gentle wipe if you notice any smudges or dirt. Keeping the lens clean will ensure that your pictures come out sharp and clear.
2. Check and adjust focus
Sometimes, the camera may not be properly focused, resulting in blurry pictures. To address this issue, follow the steps below to check and adjust the focus settings on your iPhone:
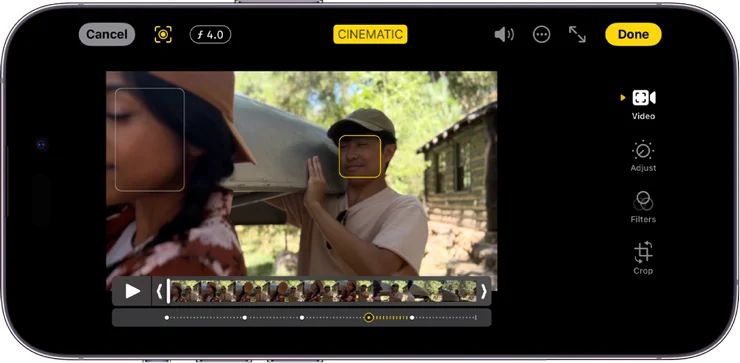
1. Tap and hold on the area of the image you want to focus on. This will activate the autofocus feature of your iPhone camera. By tapping and holding, you ensure that the camera focuses on the specific area you want, rather than relying on autofocus to guess.
2. To lock the focus on that specific area, keep holding until you see a yellow box appear on the screen. This indicates that the focus has been locked.
3. Alternatively, you can use the AE/AF (Auto Exposure/Auto Focus) lock feature. Simply tap and hold the screen until the yellow box appears. This not only locks the focus but also locks the exposure settings, ensuring that both are maintained throughout the shooting process.
By checking and adjusting the focus settings, you can greatly reduce the chances of capturing blurry pictures on your iPhone. This simple technique allows you to have more control over the focus point and ensures that your subject is sharp and clear in the final image.
3. Stabilize your iPhone – Shaky hands can cause blurry pictures. To avoid this, stabilize your iPhone by using a tripod or resting it on a solid surface. If a tripod is not available, try to hold your iPhone with both hands and keep your arms close to your body for better stability.
One of the most common reasons for blurry pictures on the iPhone is shaky hands. Even the slightest movement can result in a blurred image. But don’t worry, there are simple techniques you can use to stabilize your iPhone and capture clear and sharp photos.
The first option is to use a tripod. A tripod is a three-legged stand that securely holds your iPhone and keeps it steady. This eliminates any movement caused by shaky hands, providing a stable platform for capturing photos. There are many tripods available in the market, ranging from compact and portable ones to heavy-duty professional tripods.
If you don’t have a tripod or don’t want to carry one around, don’t worry. You can still stabilize your iPhone by resting it on a solid surface. Look for a flat and stable object like a table, ledge, or even a wall. Place your iPhone on this surface, making sure it is positioned securely. This will help eliminate any movement caused by shaky hands and produce clearer photos.
If resting your iPhone on a surface is not an option, try holding it with both hands. This provides more stability compared to holding it with just one hand. Hold your iPhone firmly, ensuring a secure grip. It’s also important to keep your arms close to your body for added stability. This helps minimize any shaking or movement that could cause the photos to appear blurry.
By stabilizing your iPhone, either with a tripod, resting it on a solid surface, or holding it with both hands, you can significantly reduce blurry pictures caused by shaky hands. Experiment with different stabilization techniques and find what works best for you. You’ll be surprised how much of a difference a steady hand can make when it comes to capturing clear and sharp photos with your iPhone.
4. Adjust exposure and brightness
Sometimes, incorrect exposure or lighting conditions can result in blurry pictures on your iPhone. However, there’s a simple solution to fix this. By adjusting the exposure and brightness settings on your iPhone camera, you can significantly improve the clarity of your photos.
To begin, tap on the screen where your subject is located. This will enable the focus and exposure controls. Once the yellow box appears, hold your finger on the screen to lock the focus on the subject.
Next, you’ll notice a small sun icon on the right side of the focus box. This is the exposure control slider. By sliding your finger up or down on the sun icon, you can manually increase or decrease the exposure level of your photo.
If your image appears too dark or underexposed, slide your finger upwards on the sun icon to increase the exposure. On the other hand, if your photo is too bright or overexposed, slide your finger downwards to decrease the exposure.
It’s essential to find the right balance and adjust the exposure level based on the specific lighting conditions of your scene. Experiment with different exposure settings until you achieve the desired result.
Keep in mind that adjusting the exposure can also impact the overall brightness of your image. If you find that your photo is still too dark or too bright after modifying the exposure, you can further refine the brightness using the respective control in post-processing or editing apps. These apps offer additional tools to fine-tune the brightness and other aspects of your photo.
By taking control of the exposure and brightness settings, you can optimize the image quality and minimize the chances of capturing blurry pictures on your iPhone. Remember to practice with different lighting situations to become proficient in adjusting the exposure and brightness for various scenarios.
5. Use burst mode or Live Photos

If you’re trying to capture a moving subject, using burst mode or Live Photos on your iPhone can significantly improve your chances of getting a clear and sharp shot. Both features are designed to capture multiple images in quick succession, allowing you to choose the best one with the best clarity.
Burst mode is particularly useful for fast-moving subjects. When you enable burst mode, your iPhone will capture a series of rapid-fire shots when you press and hold the shutter button. This burst of photos increases your chances of capturing the perfect moment, even if the subject is in motion.
On the other hand, Live Photos captures a short video clip along with the photo. When you take a photo with Live Photos enabled, your iPhone will also record a few seconds of video before and after the shot. This added video clip gives you more flexibility in choosing the best frame from the sequence.
Once you have taken photos in burst mode or Live Photos, you can easily review and select the sharpest image. In the Photos app, locate the series of burst photos or Live Photos and tap on it. From there, you can swipe through the images to find the one that is clear and sharp.
To further enhance your selection process, you can use the “Select” feature in the Photos app. Simply tap on “Select” and then swipe through the series of images. As you do this, the photos will be displayed in a larger format, making it easier to identify the image with the best clarity. Once you have made your selection, you can save it and delete the rest of the burst or Live Photos.
Using burst mode or Live Photos is a fantastic way to increase your chances of capturing a clear shot when photographing moving subjects. Whether you want to capture the perfect action shot of a sports event or capture the candid expression of a loved one, these features give you the flexibility and convenience to choose the best image from a sequence of shots.
6. Edit and Enhance with Photo Editing Apps
After taking a blurry picture, you have the option to edit and enhance it using various photo editing apps available on the App Store. These apps offer features like sharpening, noise reduction, and overall image improvement to help fix and enhance the clarity of your blurry photos.
One popular photo editing app is Adobe Photoshop Express. This app allows you to adjust the sharpness of your photo, reducing blurriness and enhancing detail. You can also use the noise reduction feature to minimize graininess in low-light or high ISO photos. Additionally, Photoshop Express offers a variety of filters and effects to enhance the overall look of your image.
Another popular option is Snapseed, a powerful photo editing app developed by Google. Snapseed provides precise control over image adjustments, including sharpening. You can selectively sharpen certain areas of your photo to improve clarity while maintaining a natural look. The app also features a wide range of editing tools, such as curves, vignette, and healing brush, allowing you to correct other imperfections and enhance the overall quality of your blurry photo.
If you’re looking for a user-friendly and intuitive photo editing app, consider using VSCO. VSCO offers a wide selection of filters and editing tools that can help you fix and enhance your blurry photos. You can adjust the sharpness, contrast, and saturation of your image to bring out more details and improve overall clarity. The app also allows you to explore and download filters created by other users, providing endless possibilities for editing your photos.
For those who prefer a simpler editing experience, the app Afterlight offers a range of quick and easy editing tools. Afterlight allows you to sharpen your blurry photos with just a few taps, instantly improving their clarity. The app also provides options for adjusting brightness, contrast, and saturation, giving you control over the overall look and feel of your image. With its intuitive interface and hassle-free editing features, Afterlight is a great choice for beginners or those who prefer a streamlined editing process.
Lastly, if you’re willing to invest in a more advanced photo editing app, consider using Lightroom Mobile. Lightroom offers powerful editing capabilities, including advanced sharpening tools and noise reduction algorithms. With Lightroom, you can fine-tune the sharpness of your blurry photos, bringing out intricate details and improving overall clarity. The app also allows you to create and apply presets, saving time and ensuring consistent edits across multiple photos.
Remember, when using photo editing apps to enhance your blurry pictures, it’s essential to strike a balance between improving clarity and maintaining a natural look. Avoid over-editing your photos, as excessive sharpening or noise reduction can result in an artificial appearance. Take the time to experiment with different editing tools and techniques to find the best approach for each specific photo.
7. Use third-party camera apps
If you consistently experience blurry photos with your iPhone’s default camera app, you can try using third-party camera apps that offer more advanced features and manual controls. These apps may provide better settings and options to capture sharper images, such as focus peaking and exposure compensation.
One popular third-party camera app is Camera+ 2. This app offers a range of manual controls, including focus peaking, which helps to highlight the areas of your image that are in sharp focus. By using focus peaking, you can ensure that your subject is properly focused and eliminate blurry details.
Another option is ProCamera. This app allows you to manually adjust exposure settings, including shutter speed and ISO, providing more control over the amount of light entering the camera sensor. By fine-tuning these settings, you can reduce the chances of getting blurry images caused by incorrect exposure.
Halide is another highly-rated camera app that offers advanced controls like focus peaking and exposure compensation. With exposure compensation, you can adjust the brightness of your photos, ensuring that they are not overexposed or underexposed, which can lead to blurry details.
Using third-party camera apps also gives you access to additional features like RAW capture and advanced image editing tools. RAW capture saves uncompressed image data, allowing for more flexibility in post-processing and enhancing image clarity. With advanced editing tools, you can further enhance the sharpness and overall quality of your photos.
Before choosing a third-party camera app, read reviews and check the app’s capabilities to ensure it has the features you need. Remember to experiment with different settings and techniques to find the optimal configuration for capturing sharp and clear photos.
In conclusion, dealing with a blurry picture on your iPhone can be frustrating, but it is a common issue that can be resolved with a few simple steps. By adjusting the focus, cleaning the camera lens, or using editing tools to enhance the image, you can easily restore clarity to your photos.
Remember to check your camera settings and ensure that you have adequate lighting for the best results. Additionally, keeping your iPhone updated with the latest software version can also improve camera performance and image quality.
So the next time you encounter a blurry picture on your iPhone, don’t panic. Take a deep breath, follow the troubleshooting tips mentioned in this article, and you’ll be able to capture and share clear, crisp images with your friends and family once again!
")


