Proper exposure is essential for quality photographs. But what is the proper exposure?
A correct exposure is one that you are satisfied with. It means you’ve properly adjusted the aperture, shutter speed, and ISO parameters. The outcome is that neither too much nor too little light has made an imprint on your camera’s sensor.
However, selecting the appropriate exposure settings might be similar to determining what to wear on a night out. Alternatively, To be most effective, you must maintain the proper balance.
Setting the optimum exposure is a subjective procedure influenced by technical concerns. You may change your camera’s settings automatically or manually, such as the aperture, shutter speed, and ISO. Manual mode allows you greater creative control when exposing your subject. You may make it look brighter or darker than it is. This is one tool that photographers use to capture mood in their photos.
A technically accurate exposure includes detail in both the shadows and the highlights of a photograph. The photograph will also have a strong tone range. Many photographers strive for technical accuracy in exposure. This is OK if that is what you choose.
In this post, I will look at the balance between the technical and creative components of proper exposure. Sometimes they are the same. Other times, they are not.
Finding the Balance of a Correct Exposure

Some genres of photography are best with technically correct exposures. Setting the exposure triangle so enough light hits the sensor. So detail remains in the shadows and the highlights. So the scene has a broad range of tonal values.
Other genres are more suited to photographers who like to make creative choices to create mood and set an atmosphere in their photos. If parts of the composition are very dark or bright, this adds impact to a photo.
There is always room for cross-over too, as the best photography is not confined to a set of rules. Capturing images exposed how you want them to be is one of the key creative components in photography. This should not be dictated by a bunch of technical rules. But don’t toss out the baby with the bathwater. Making a perfect exposure includes managing the camera’s exposure settings. And doing this with an understanding that results in the right amount of light hitting the sensor.
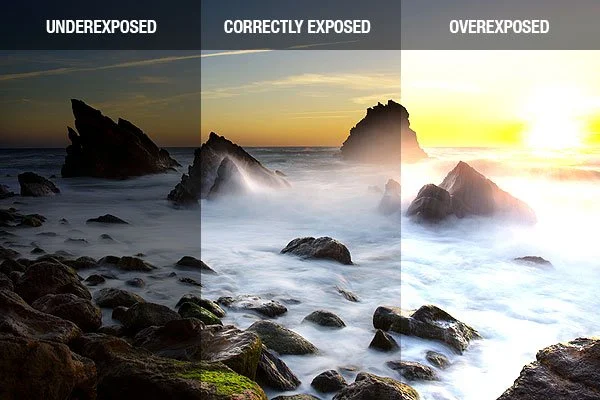
Too much light results in overexposure. The image is too bright. With too little light underexposure occurs and the image is too dark.
Your camera is a complicated piece of electronic hardware. THa’ts unless you’re using a old-school film camera. Either tool has limitations. You must manage the aperture and shutter speed and ISO to capture well-exposed images that you can then apply post-processing to.
Seek to find a happy place where the technical and creative aspects of photography collide. When they do, the combination makes the perfect exposure. One that’s a balance between the technical and creative aspects of photography.
Dynamic Range and Tone Range

Dynamic range is the luminance range a camera’s sensor is able to record, between black and white. The term ‘tonal range’ describes the number of tones captured in a photo.
Dynamic range is limited in any camera. In a single frame, the sensor in your camera is not capable of recording the same broad range of tones we can see with our eyes. This is why it’s important to manage your exposure triangle settings well.
The tonal range in a photo depends on:
- How much light is illuminating the scene.
- The quality of the light.
- Exposure settings
- The tonal range in the subject.
All of these factors must be considered independently but not exclusively. Combined they will help you produce well exposed photos.
How Much Light is Illuminating the Scene?
Whether you are taking photos where there’s a lot of light or not much light, this will have an influence on the camera settings you choose.
When you are using your camera on manual mode, you obviously will have to choose the best settings for a correct exposure. In any auto or semi-auto exposure modes, your camera will decide what settings to use. A faster shutter speed, a narrower aperture and/or lower ISO settings when a scene is well lit. In scenes with low light, a slower shutter speed, wider aperture and/or higher ISO are needed.
What About the Quality of Light?
Hard light or soft light? A scene illuminated by more than one light source, or with reflected light affecting it. These various qualities of light affect the tonal range that might be captured.
In hard light the tonal range is often greater, but there may not be a full range captured. This depends on the subject and the exposure settings. In hard light you can make an image that’s only black and white, with few or no mid-range tones.
Soft light is more likely to provide opportunities to create exposures with more mid-range tones. The shadows will not be so dark nor the highlights so bright as with hard light.
In scenes lit from more than one source, the tone range in a photo can be varied greatly when you have control over the lighting.
Exposure Settings Affect Tonal Range
Choosing a wider aperture for a shallow depth of field affects your exposure. As does opting for a fast shutter speed to freeze motion. Balancing an aperture of f2.8 requires a fast enough shutter speed. Setting your shutter speed to 1/15th of a second on a sunny day, you’ll need to adjust your aperture to a narrower setting. It will become challenging to achieve a shallow depth of field. Using ISO 100 will help, but may not be enough. Waiting until there is less light will help you get a correct exposure and a shallow depth of field.
To capture a perfect exposure and maintain creative control over aspects such as depth of field and motion blur, you need to understand how to use your camera well. You also need to understand metering well.
Metering Well
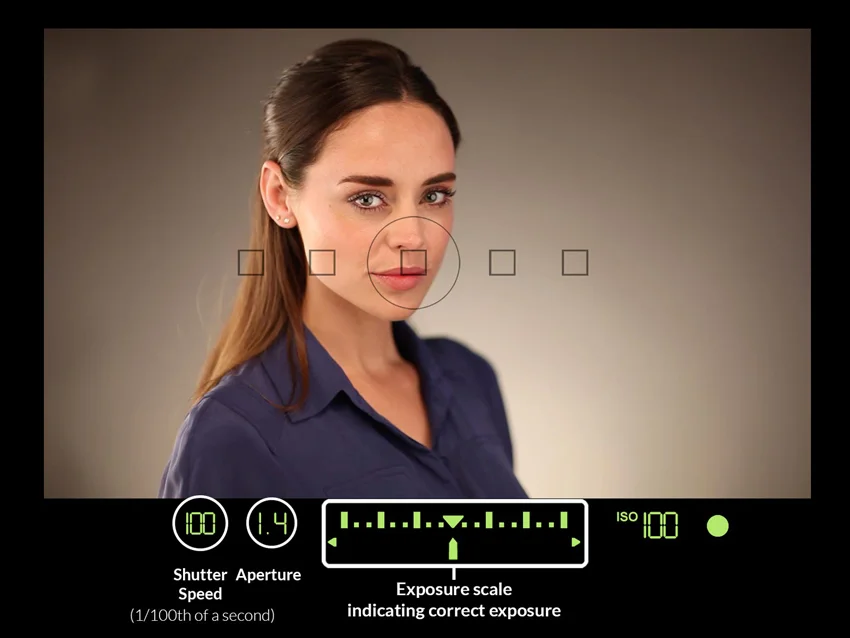
Metering for the highlights, mid-tones, or shadows produces varied exposures. Your modern digital camera has at least three exposure meter settings. These read the light in a scene differently. Let’s look at the main two metering modes that will help you get a correct exposure.
One will be averaged metering. Nikon calls this Matrix metering. Canon calls it Evaluative metering. The exposure meter reads the scene from many points and provides an averaged result.
Another mode is spot metering. In this mode, you can choose a small part of your photo to make a reading from. Using this mode you can read from a highlight, a shadow, or a mid-tone. With this mode you can be very precise with how you control the exposure of your image.
I often use averaged and spot meter modes to help me decide how to adjust my camera settings.
Learning to set your exposure well manually, or by using exposure compensation, takes time and practice.
How Varied is the Tonal Range in Your Subject?
How much tonal variation in the scenes you photograph must be considered when you want to make a correct exposure. Some subjects will have very little tone range. These are easy to expose for. In any auto mode you’re unlikely to need exposure compensation because the camera will predict a correct exposure.
Photography of subjects with deep shadows and bright highlights are more likely to challenge a camera’s dynamic range. You may not be able to set a correct exposure that captures detail in the brightest and darkest areas of your picture.
The histogram in your digital camera provides you with information to know when you are losing detail at either end of the tone range. When the histogram graph is bunched up to the left and hitting the top, you have lost detail in the darkest parts of your picture. When the histogram is bunched to the right and hitting the top, you’ve lost details in the highlights.
The histogram does not show you when you have a correct exposure, but it is helpful for showing you when detail is not being recorded in an image.
A Correct Exposure is What You Make It
As you can see, there are many aspects to capturing a well-exposed image. Leaving your camera on auto often produces an acceptably exposed image. When the light is diffused and your subject is not high contrast you are unlikely to need exposure compensation when on auto.
In manual mode, you can leave your meter set to averaged when the tonal parameters are narrow. In high-contrast scenes using your spot meter will help you decide the settings to use for a correct exposure.
High contrast means more decision-making. This is because the limits of illumination will be beyond your digital camera’s ability to record every tone.
Learning the technical aspects of exposure control and light helps you to make more informed choices. Once you are confident to manage your camera well you will be freer to become more creative with your photography.
")


